

I am SO excited to share this DIY with all of you! As you know, Jodie and I just got back from celebrating Kate's 30th birthday in Ohio. It is kind of a tradition of ours to make each other our gifts. Everyone knows that the best presents are not bought, but made!
Jodie found a pillow similar to this one on Etsy, but for almost $70!!! My first thought when she showed it to me was "Oh My! That is perfect!" My second thought was "I can totally make that!" I seam to have thought #2 quite often. I secretly think I can make anything. ;)
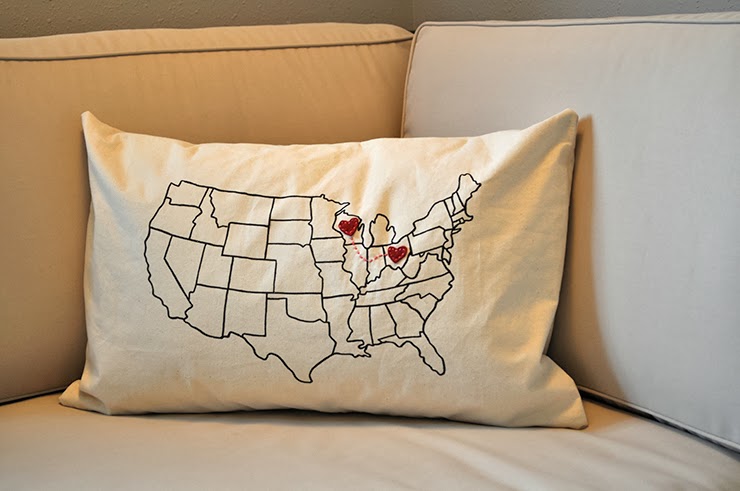
So that is what we did! We made it! Here is the complete tutorial with way too many pictures.

| Step #1 - Download & print this FREE map image. It is sized to fit an 11x17" piece of paper, but can be downsized and printed on an 8.5x11" to fit a smaller pillow as well. DOWNLOAD HERE |
 |
| I used a Lands' End 14x22 pillow insert, but you can use whatever size you have/want. It explains on the pattern how to adjust the size of your pattern to fit your insert size. |
 |
| These are the fabric markers I used. |
 |
| Step #2 - Using a pencil, draw your cut lines onto your fabric. (See measurements below) |

 |
| Step #3 - Cut out your panels. |
 |
| Step #4 - Iron the inside edges of the back panels. (see below) Flip over once (about 1/4") and iron. Flip over again and iron so that no raw edges are showing |
 |
| Step #5 - Sew the edges you just ironed. (Sorry, I forgot to snap a pic of me actually showing this) You could either zip zag stitch the edges or double stitch them like I did. (See Image in step 11 for a close up.) |
 |
| Step #6 - Set up for tracing your image onto your front panel. Place something soft down on the table first. (I used a piece of felt doubled up, but you could also use a tablecloth or towel folded a few times.) Then place your front panel fabric down and then your map image printed on thin paper over that. Pin all pieces together at the top corners to prevent slipping. (Look at the picture above to see how I pinned the top corners with straight pins.) |
 |
| Step #7 - With a ballpoint pen, begin to trace over the map. Make holes in the paper (slightly ripping through) to transfer some of the ink onto the fabric. Keep flipping up the paper as you go to trace the image with the fabric pen onto the front panel of your pillow. This step will take you a little time. |


 |
| Step #8 - Cut two small hearts out of your red felt. |
 |
| Step #9 - Using your pink embroidery thread, sew the two hearts and the path onto your pillow. (make sure they are on the correct states!! lol) |
 |
| Step #10 - Get your pillow ready to be sewn. Lay your front panel down on the table. Place the two back panel over the top panel so the raw edges are facing up and the panels are overlapping. |
 |
| Step #11 - Pin and Sew your Pillow. Double stitch all around the edge of your pillow. (See below for a close-up.) |

 |
| Step #12 - Turn your pillowcase inside out and stuff your pillow insert inside! DONE! You have yourself a 'State to State" Pillow to mail off to your favorite long distance friend! :) |


This is absolutely fabulous! I may just have to make one of these, but we would only have one heart since we've only lived in GA! LOL
ReplyDeleteI am obsessed with this Katie! I just moved from Utah to Texas and I feel like this would be the perfect thing to have on my couch AND to give to family members for Christmas. Top shelf!
ReplyDeleteI love this! It seems so doable! Thanks for all the pictures, not too many for me. I, too, feel like I can make anything I see on pinterest, but this one seems more realistic for me to actually finish. So cute!
ReplyDeleteI made this today for my mother for Mother's Day! It came out perfect, thanks for the awesome tutorial!
ReplyDeleteVery classy! You are so creative and talented! Thanks for the tutorial. I have been looking for a pillow for my couch. Think I found it!
ReplyDelete